
 This is the second article in a “getting started with DSC Development”, covering tools and workflow. The previous post was covering general Windows Automation techniques, some of them existing since the Windows XP days and before!
This time we’ll look at tools, techniques and workflow that will enable us to make changes using scientific method, iteratively.
Introduction
For the demo of my session at WinOps London I was looking for the simplest way someone could experiment with DSC and Windows configuration technologies, while also having a glimpse of a sustainable workflow.
The Test-Kitchen framework and its different components make it very convenient for getting started quickly, easily and making progress iteratively.
This post is an attempt to introduce you to Windows server automation development, starting from scratch (Windows Evaluation VHD) and manual (with GUI), incrementally moving towards a more streamlined workflow with PowerShell, Test-Kitchen, Kitchen-DSC, kitchen-hyperv, Pester, git and whatever comes handy!
Prerequisites:
This step by step guide assumes a few things:
- Your dev system is running Windows
- WMF 5 or greater is installed
- Hyper-V is installed and configured
- You have a Hyper-V vSwitch configured
- You have IP (DHCP?), DNS and Internet access from your vSwitch
Plan:
- Kitchen DSC development workflow
a. The Release Pipeline Model
b. Mapping Test-Kitchen to TRPM
c. Test-kitchen Architecture - Setup Test-Kitchen Environment
- Bootstrap Test-Kitchen
a. SCM, cuz you need it
b. .kitchen.yml basics
c. Pester tests - Putting it together
a. Testing the Setup
b. Making your first change
The Kitchen DSC development workflow
a. The Release Pipeline Model
When trying to automate the management of your server estate, it might be overwhelming to go from the injunction “manage your servers like cattle, not pet” to actually go and figure out what that means, what are the benefits, how to implement this to a Windows environment, and what tools might be useful along the way.
The good news, is that Microsoft in collaboration with Chef Software (Michael Greene and Steven Murawski), have released a brilliant whitepaper describing those concepts in details: The release Pipeline Model (TRPM thereafter)
Michael Greene also presented it during the WinOps conference 2016: The Release Pipeline Model (also on Channel9).
Although this model encompass the whole delivery pipeline of an IT Operation team, Test-Kitchen allows you to have a simplified version of this workflow on your dev machine, giving you similar benefits, a very short feedback loop, and will ease your transition to scale out to production.
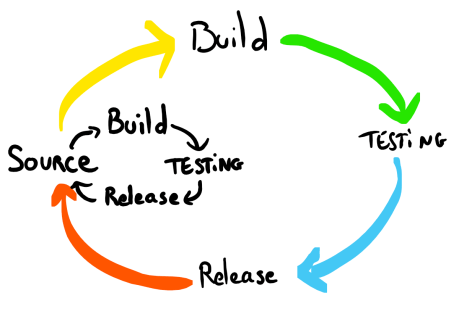
In the TRPM the simplified flow is Source – Build – Testing – Release.
The use of Test-Kitchen I will describe here, can be seen within a global Release Pipeline, in the source step: That means I focus on what a developer would experiment locally (at least in an isolated environment).
You will develop your configuration locally by writing your source, building, and testing locally as you progress, until you’re happy with a change, and release them to your environment via commit / push / Pull-request (whatever your workflow is) to the environment’s Source repository. In turn, this change will trigger system-wide build / test / release: Your environment‘s global delivery pipeline.
Although you don’t have to do this locally, the target of this article is for someone to start experimenting quickly with little infrastructure, and a very short feedback loop, hence my recommendation on doing this locally.
Test-Kitchen can also be leveraged in a global Release pipeline, but it is out of scope for this post and would also require other components. This could be the next thing someone would try to set up once they’ve got their local playground working and get their first deliverable ready.
b. Mapping the Kitchen workflow with TRPM
There’s a very good intro to test-kitchen here that I found quite late in my journey, but some parts are focused on Chef (to be fair, the site is to “learn chef”).
Bear in mind that what I describe here is my interpretation, and one of the ways of working with it. I’m sure there are other approaches, which would be interesting to get feedback from (please blog them and post link in comments). Particularly, there are a few challenges and work-around when you want to scale this up to a bigger system (multi nodes), or integrate with other “variables” (team, technology…).
Here I assume the following scenario:
- You (or your customer, even internal) have an idea of what the need is, configuration-wise
- You are starting to configure a single node system
- You know how to configure it manually (i.e. through the GUI)
- You can find how to test the setting in PowerShell
- You can find how to configure the setting in PowerShell
- You are using TDD, because you should 🙂
Within that inner loop, for each user story (single, value-adding, configuration item) here’s what you’d do:
- Experiment with the configuration (i.e. manually)
- Write the Pester Test that confirms the settings is what you expect
(you can try that on a manually configured VM) - Run that test on an un-configured VM and confirm it fails
(Because you should “Never trust a test that you haven’t seen fail“) - Write the configuration of your configuration item
- Try to apply your configuration definition to the base image (converge)
- Run the Pester test you wrote and confirm it passes (Verify)
- Destroy the VM to start afresh (destroy)
- Run your test suite end to end (that’s a full test: converge – verify – destroy)
- Commit to SCM (i.e. git)
- To add another item, go back to one adding more test and configuration one at a time
You can roughly see the mapping of those steps with TRPM:
- 1 to 4 are the SOURCE step
- 5 could be seen as the BUILD (I know, you may see it as part of testing phase)
- 6 – 8 the TESTING
- 9 the RELEASE
Note: Especially if you’re starting with Policy Driven Infrastructure (aka. Infrastructure as Code) or DSC, make sure you start with something very simple that you are sure to work. It will make learning the platform and debugging easier with a small starting scope. Only then you can iteratively add small changes and test them often. This loop will allow you to add variables, and potential breaking changes, one at a time, in small batches.
This will be giving you instant and targeted feedback on specific changes when something does not work.
Same goes with implementing TRPM, if you try to do everything from the start, you have too many source of conflicts/failures, follow the KISS principle!
Test-kitchen handles the steps 5, 6, 7 automatically when you run a test.
Calling kitchen test, will actually run a sequence of the following commands.
– Kitchen converge
– Kitchen verify
– Kitchen destroy
Unless an exception is raised and the process stops (so that you can troubleshoot the issue).
Under the hood, here is an overview of what’s happening during that process.
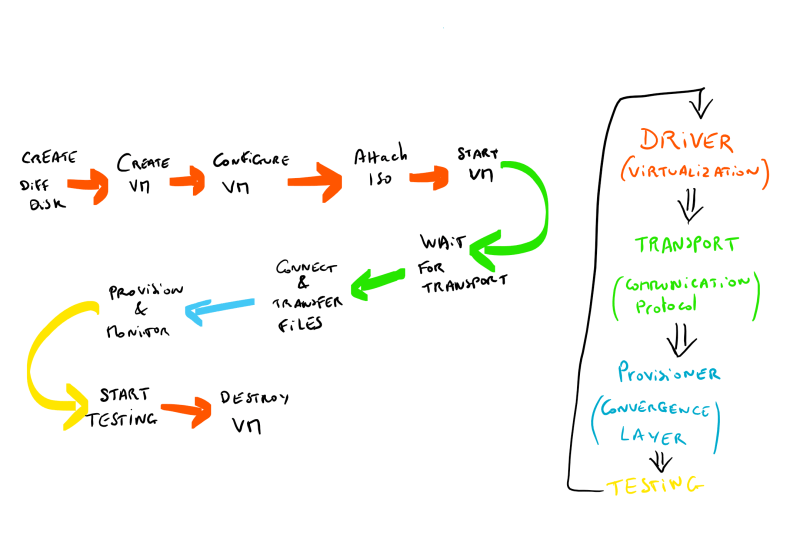
c. The Kitchen Architecture
Apologies for the quick and dirty hand drawings, but that’s a quick way to illustrate. Below I’ve represented part of the architecture of Test-Kitchen and the components we are using for getting started with DSC.
To make the principle work across different OS and technologies, the design of Test-Kitchen is abstracting each specific technology in layers, to achieve low coupling, high cohesion.
The obvious benefit, is that in my example I use Kitchen-HyperV as my Test-Kitchen driver, but you could use any of the available alternatives or develop your own, the rest would still be relevant without changing.
For instance, Steven Murawski in his example uses vagrant to drive the virtualization layer.
Our case leverages DSC for the Provisioning (converging to our expected state), but you could also use Chef.
Pester is our test framework used as the verifier, but should we want to create and use another one, it is possible to do so without affecting the other layers.

Note: It is worth noting that despite their name and the diagram, the communication between test-kitchen and the different components of the Virtualization solution requires connectivity. To that regard, I have assumed (and drawn) a LAN that has access to Internet via a Layer 3 device that also provides IP (via DHCP?) and DNS, to both the Dev Machine and the test VM. It is not a hard requirement, but that is the easiest scenario to be in.
Note: Not all layers or components are represented in the diagram, and especially one is missing between Transport and Driver: the PLATFORM. To keep it simple for now I have left it out, and will explain more when looking at the .kitchen.yml configuration file.
Setup Test-Kitchen Environment
This bit is easy and has been covered by Steven Murawski on his blog: Getting Started With Test-Kitchen and DSC.
That’s what triggered me to give it a go and write this post not too long ago.
Install-package chefdk
Note: once you’ve installed the ChefDK via PowerShell Package management (or Chocolatey), the Path may not be updated in your current session (so you won’t be able to call the command chef). [choco v9.10 fixes that, not PPM]
Either open a fresh console, or add the ChefDK path to your Path environment variable:
$env:Path += ';C:\opscode\chefdk\bin\'
You can now call the chef command to install the required gems:
chef gem install kitchen-dsc kitchen-pester kitchen-hyperv

Bootstrap your Test-Kitchen for DSC
To get you started quickly and simply, you may start by watching the Mississippi PowerShell User Group recording on that subject: Acceptance Testing PowerShell Desired State Configuration with Test-Kitchen
If you’re more the kind of people who likes to play with technology before the explanation, you can try the following ways:
- Use Steven Murawski’s example project xWebAdministration (I recommend this if you already know the basics of DSC)
- Use my very simple Test-kitchen project first (reduces the number of variable before you add more later)
a. SCM, you need it. Period.
It might be obvious for many, but for the rest: You need a Source Code Management software.
Git is probably the most popular these days, and it’s pretty easy to install (remember, install-package git with WMF 5).
The whys and how are beyond the scope of this post, but you will want to version the changes you are making during your development. Best is to sync them to a central location (such as github / bitbucket or any other) to serve as a backup, or even better, to enable collaboration!
If you use git and github, you may want to fork my repo to your account, and clone it to your desktop.
To fork, start by browsing to the repo: https://github.com/gaelcolas/winopsconf
Click on ‘Fork’ on the top right corner:
 Then clone your repository to your workstation:
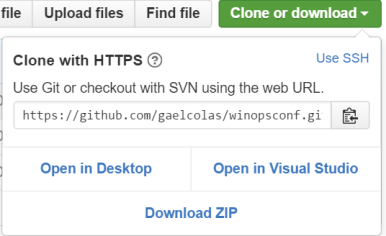
What you get is a folder with all the files needed to get started, my slide deck from the WinOps Conf London (you won’t need it, feel free to delete it), and a readme.md with some light information.
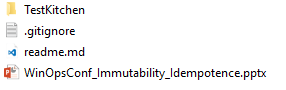
Note: The gitignore is configured to ignore .iso files (see my trick for unattend.xml), .kitchen/ folders (the bit test-kitchen creates you won’t need to keep versions of, like VM diff disks).
The interesting bit for you is what’s in the TestKitchen folder.

The YAML file .kitchen.yml is your test configuration, more details to follow.
b. kitchen.yml basics
You can find the documentation for the configuration file .kitchen.yml here: https://docs.chef.io/config_yml_kitchen.html
I’ll detail the specifics for Test-Kitchen on Windows using Kitchen-Hyperv and for Kitchen-DSC with Kitchen-pester.
Note: Ruby does not like BOM. This is annoying because on PowerShell natively creates files in UTF8 with BOM, which creates issues for Test-Kitchen.
Here’s the issue I got:
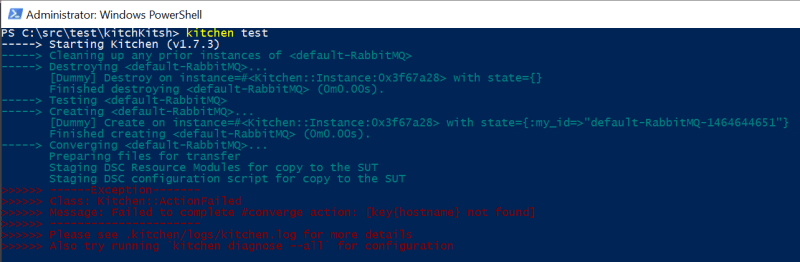
If you use Visual Studio Code for your Edits it should say at the bottom right in the status bar:

The file is a YAML definition of different section for the different components.
Hyper-V Driver:
As we’re using Hyper-V for this example, here’s how the driver section look like.
The driver settings are the defaults, unless a platform is defined in the Platforms section.
Bear in mind that different drivers might support different functionalities. For instance, the boot_iso_path is an addition I made (Merged by Steven Murawski in kitchen-hyperv 0.2.0) so that I could do the Unattend.xml ISO trick.
driver:
    name: hyperv
    parent_vhd_folder: C:\src\hyperv\WIN2012r2WMF5
    parent_vhd_name: WIN2012r2_WMF5.vhd
    boot_iso_path: C:\src\kitchens\TestScript\Unattendxml.iso
    #iso_path: C:\src\kitchens\TestScript\other.iso
    memory_startup_bytes: 1073741824
    vm_switch: NAT
    ip_address: 10.111.111.123
    subnet: 255.255.255.0
    gateway: 10.111.111.1
    dns_servers: ['8.8.8.8']
Remember that you should ensure the vm_switch has the right connectivity to communicate with your development machine.
After some issues with DHCP at work, I finally opted to use a NAT vSwitch available in Windows 10 or Win2016, here’s a good post on the subject.
As we have done manually in the other post, the hyper-v driver for Test-Kitchen will
1. create a differencing disk from the parent VHD
2. create a VM based on that diff disk and other configuration
3. Attach the ISO to the DVD device
4. Starts the VM
WinRM Transport:
The transport mechanism is in essence the protocol used to communicate with the VM.
SSH is the de-facto standard for Linux VMs and WinRM is the standard for Windows.
We can imagine that one day, someone may develop a PowerShell Direct driver for Test-Kitchen.
transport:
   name: winrm
   username: Administrator
   password: P@ssw0rd
   #matches the Admin password set in the Unattend.xml file
This is what Test-Kitchen will use to transfer file, and invoke command remotely.
DSC Provisioner:
The provisioner we chose is kitchen-DSC, so this section allows you to configure the DSC engine (the LCM) on the VM with the settings. Bear in mind that we’re expecting WMF5 (the config settings changes slightly from wmf4 an wmf4_with_update).
Good to note that Kitchen-DSC now supports reboots initiated by DSC.
provisioner:
    name: dsc
    dsc_local_configuration_manager_version: wmf5
    dsc_local_configuration_manager:
        reboot_if_needed: true
        #configuration_mode_frequency_mins: 30
        #debug_mode: none
    configuration_script_folder: examples
    configuration_script: dsc_configuration.ps1
    #modules_path: .
    #configuration_data_variable: configData
    #modules_from_gallery:
    # - xPSDesiredStateConfiguration
    # - PackageManagementProviderResource
Verifier:
The verifier is the driver that is used to check if the convergence is a success, in our case kitchen-Pester: It runs a series of Pester (all it can find) tests and if there are no failed test, the result is considered successful. Here I specify the path to my test files, but this folder is what Kitchen-Pester uses by default anyway.
verifier:
   name: pester
   test_folder: Tests/Integration
Platform:
This is the list of platforms available to run test suites. The most obvious use case is to have a test suite running on different platform such as Windows 2012 R2, and Windows 2016.
platforms:
    - name: 2012r2_WMF5
      os_type: windows
      shell: powershell
    driver:
        parent_vhd: C:\src\hyperv\WIN2012R2\WIN2012r2_WMF5.vhd
    provisioner:
        dsc_local_configuration_manager_version: wmf5
    - name: WIN2016
    driver:
        parent_vhd: C:\src\hyperv\WIN2016\WIN2016.vhd
    provisioner:
        dsc_local_configuration_manager_version: wmf5
As you can see, you can override the driver’s default depending on the platform.
Note: When the platform is named win* it assumes windows, if the shell/os_type settings are not specified. Should you omit the Shell and Os_type and name your platform without prefixing with win, Test-kitchen will fail.
Suites:
The test suites you would like to run, with order and target (platforms).
We’re keeping it simple for now so we’re just using a default suite without parameter.
suites:
    - name: default
c. Pester tests
Pester is a Test framework for PowerShell. Using its DSL coupled with PowerShell’s capabilities to query a system, you can leverage it to test if a system has its settings configured as you expect.
In the Test-Kitchen and DSC context, it allows you to validate that the configuration made by DSC after convergence is what you expect.
The test I use for this demo is very basic, as the only goal is to demonstrate how a test would pair with the configuration.
My dsc_configuration.ps1 example is a simple Script resource that will simply Create a file C:\winops.txt on the tested platform.
This file contains hidden or bidirectional Unicode text that may be interpreted or compiled differently than what appears below. To review, open the file in an editor that reveals hidden Unicode characters.
Learn more about bidirectional Unicode characters
| Describe 'checking File Exists' { | |
| it 'Should resolve to C:\WinOps.txt' { | |
| { Resolve-Path C:\WinOps.txt -ErrorAction Stop } | should not Throw | |
| } | |
| } |
The test above expects to resolve C:\WinOps.txt and return the object.
As we’re starting with a ‘clean’ image every time, should the DSC Configuration not work this test would fail.
We’ll dig further to see how that workflow works end to end once we’re setup.
Kitchen + Pester + DSC: Putting it together
I’ve spent a long time on the purpose, explaining the workflow and the components, but I believe it’s something people miss far too often when experimenting with a new tool. Now that we have the background, and all the pieces, let’s connect the dots with an example.
a. Testing the setup
Assuming you’ve cloned my example, the first step will be to adapt the configuration file to match your environment:
Specifically you need to update your VHD details, unattendxml.iso, vm_switch and IP addressing.
Don’t forget to change the Parent_vhd in the platforms section.
When this is done, you can try a kitchen converge. If you see a VM being created and started, you should be good to carry on.

If you did not change the dsc_configuration.ps1, then the converge should be successful, make sure you test before doing further configurations. If it is, then you should commit and push your changes to your git repo.
Now that you’ve configured your machine, you want to ensure the configuration is what you expect: you will run the test that verifies that the file exists on the system.
This file contains hidden or bidirectional Unicode text that may be interpreted or compiled differently than what appears below. To review, open the file in an editor that reveals hidden Unicode characters.
Learn more about bidirectional Unicode characters
| Describe 'checking File Exists' { | |
| it 'Should resolve to C:\WinOps.txt' { | |
| { Resolve-Path C:\WinOps.txt -ErrorAction Stop } | should not Throw | |
| } | |
| } |
Simply run kitchen verify, it will upload and execute the test on your test VM.
If it worked (no sea of red text in your console), you’re ready to go to the next step.
As you’ve successfully tested that a clean machine could converge to a configuration, and this configuration does what you expect, you can tear down the VM so that your next iteration starts again from a fresh VM. If you wonder why you should always start from a clean VM, please either watch my session at WinOps conference London or my post on Idempotence and Immutability.
Running a kitchen destroy will do that for you, only destroying the VM and the Diff disk test-kitchen created for you.

Sometimes you want this sequence to happen automatically all the way, unless something fails along the way. This is what the kitchen test command does for you.
It always starts from fresh, deleting previously created VMs, creating new ones and doing converge – verify – destroy.
In contrast, the kitchen converge only creates the VM if it does not exist. Calling it multiple times will only force convergence to your configuration, which is very useful when you’re trying things out. When you think you have it, just destroy your VM and try to converge from your base, or try a kitchen test, so that you’ll be ready for your next iteration if it works.
Note: Running this on a very raw VM, and doing the unattended setup step every time will add delay to your feedback loop, and at the end of the day, if you run your tests many times, it will slow you down noticeably. You should probably look into creating a lighter VM for your tests (reducing footprints, removing services, GUI, pre-installing Windows…), but always regularly test against raw VMs, so that you know you are not missing some steps. One way to do this while saving some disk space is to chain your diff disk (but be careful, changes to parents invalidates children).
Also, if you have lots of CPU intensive or memory/disk hungry applications running, this will massively slow your test down (that’s why the last recording is so loooong).
b. Making your first changes
In the previous step we merely adapted the configuration, and ensured it was working in your environment. Now that we validated it works, we can start making change to actually do some configuration.
But keep the steps small! We’ll start by making a simple change to discover the workflow.
Let’s have for objective to create another file next to the one already created by the configuration. We are not removing, the previous configuration yet, we want it to be our ‘Scientific Control’, so that we can compare the output or logs to what we just run. Remember that we want to limit the number of variables in our changes.
- Because you’re making incremental changes in configuration, you should spin up a new VM that is up to your current development: After ensuring previous VM are destroyed, simply run kitchen converge to create a clean VM and converge to your current expected state.
- Make your change, manually: Create a text file with some content in the right location.
- Create the test that validates the file is as you expect.
- Make sure running your new test fails on an cleanly converged VM (we haven’t changed the configuration yet): kitchen destroy; kitchen verify
- Automate your change by editing dsc_configuration.ps1
- Make sure your configuration is valid by running kitchen converge
- When the converge is successful, run kitchen verify to validate the state against your test
- If you’re happy with the result, try an end to end configuration by running kitchen test
- If it works, commit your change to SCM.
You’re ready to add a new change, going through the same process.

(apologies, the step 4 passed during the recording because of my pester tests, but shouldn’t… I did not follow my own advice to limit variability for the recording! I’ll release anyway and revisit later.)
Conclusion
I hope I gave a enough details for you to get started with DSC using Test-Kitchen, and provided a workflow that can help you getting started on a solid incremental wheel.
Test-Kitchen and its component like kitchen-dsc, kitchen-hyperv keep improving so do revisit periodically. If you find a bug, do post it on the issues of the github repo, and give details to reproduce. It’s actively maintained!
Thanks to Chef for making this tool open source, and for the community to contribute! And special thanks to Steve Murawski for helping me out getting started!
Let me know if I missed anything… like multiple configuration files, test-suites, what happen next in the release pipeline, multiple-nodes and so on…

2 thoughts on “Introduction to Kitchen-DSC”