
This is the first article in a series that aim to explore one way of getting started with DSC Development, covering tools and workflow.
In very short and abstract, the life cycle of a Windows Server could look like:
- Deployment (aka OSD)
- Configuration
- Maintenance
- Decommission
This series aims to focus at the Configuration part, mainly in its development phase, but also covers the basics of creating windows Image for experimentation purposes. The idea is to get started experimenting quickly, but I would not use this approach of Image creation for something that needs to be maintained.
The Test-Kitchen framework and its different components makes it very convenient for getting started quickly, easily and making progress iteratively, but I wanted to start from the very beginning, for those who start from scratch with little automation experience.
Below I explain how someone can get started, by creating a base VHD image that will be used for experimentation.
Prelude
If you want to understand the ultimate goal, and what DevOps means for some part of an IT Operations team in a Microsoft environment, I recommend watching Michael’s Greene talk at WinOps London about The Release Pipeline Model and read the whitepaper he published in collaboration with Steven Murawski.
For this series, I run my development workflow on my laptop running Windows 10, with WMF 5.1 (I’m on TP Fast Ring).
My virtualization platform for now is Hyper-V, because it’s available locally (when you enabled the feature). The main advantage beside having it readily available is the very quick feedback loop: you can spin up a clean server, configure it, assert its configuration and destroy it in a very short time. I assume you have a vSwitch configured to provide internet access to your VMs, and with DHCP.
I use git for source control.
Below we’ll see how to:
- Download Windows 2012 R2 Evaluation VHD
- Prepare Windows 2012 R2
a. Install WMF5
b. Sysprep
c. Test our base image (with diff disk VM and Pester) - Automating VM Setup/Install
a. Unattend.xml
b. DISM – Modify and Capture wim Image
c. Windows System Image Manager
Download Windows 2012 R2 Eval vhd
As the goal is to learn as quickly as possible how to get some value for a production system, we’ll be using Windows 2012 R2, but the principles are applicable to most version of Windows since 2008 R2 at least.
By default Windows 2012 R2 comes with WMF 3 (which Includes PowerShell 3), so we’ll have a look at configuring it quickly to our need, as you would do for your production image.
There are also a few tweaks that should be done to the image, to ease the management out.
To do our testing and development, let’s download the Evaluation VHD from Microsoft Download. Even if the evaluation runs out after 180 days, you’ll be able to recreate one easily.
Prepare Windows 2012 R2
With this VHD, we can create a VM the ‘Hard way’: manually, using the GUI, and prepare it. I do it this way, so that you can get a feel of the process, but I might show you how to do that automatically in another post.

Now that our VM is ready to be customized, we can get it up to our standard, in this case I’m only interested in installing WMF5 and doing a Windows Update, so that future deployment take less time.
a. Install WMF5
To install WMF5 without thinking too much about it, Ryan Rates created a sweet little script to manage that for you.
As I expect your VM to have Internet Access (through External vSwitch, or NAT) you can simply run it from his Github account.
https://raw.githubusercontent.com/kilasuit/PoshFunctions/Dev/Scripts/Install-WMF5.ps1
https://gist.github.com/gaelcolas/68ceaa17ef67d955fad689d2291b1d0c#file-runkilasuitwmf5install-ps1
This file contains hidden or bidirectional Unicode text that may be interpreted or compiled differently than what appears below. To review, open the file in an editor that reveals hidden Unicode characters.
Learn more about bidirectional Unicode characters
| Invoke-Expression (New-Object Net.WebClient).DownloadString(‘https://raw.githubusercontent.com/kilasuit/PoshFunctions/Dev/Scripts/Install-WMF5.ps1’) |
Or if you want to use his shortened url:
iex (New-Object Net.WebClient).DownloadString(‘http://bit.ly/InstallWMF5’)
This will install the right WMF5 Microsoft update for your system, and restart your machine.
When you’ve done this you can patch the system and Sysprep it to make it ready to be re-deployed fresh but with latest updates and WMF5.
b. Sysprep
As I tend to re-image my VM every now and then after tweaking it, I like to create a batch/ps1 file under the Sysprep folder that allows me to just execute it when needed.
It’s never big, but it allows for some basic clean-up before sysprep’ing, you’ll see later what for.
For now, I only run this: Sysprep.exe /generalize /oobe /mode:vm

Now we have an up-to-date Base image, ready to be automated and do whatever we want to it.
Worth taking a copy, just in case, although Test-kitchen actually makes change to a diff disk, so there’s little margin for error.
We have not baked-in any application/binary on it, and I’d recommend not to do so yet.
c. Test base image: Diff VHD and Pester
We have our image, we believe it’s up to our expectation (WMF5) but we should ensure / Validate that when we deploy that image in a new VM, it will still have the configuration we expect.
One good way to do so, is to create a new VM with a copy of the hard disk, start it, and check we have the right version in $PSVersionTable.
A better way would be to take a snapshot of that disk before starting so that we can always revert.
The best way is to create a differentiating disk based on our image so that changes are committed to another disk that we can simply destroy when we don’t need it anymore. No changes will be committed to the base image we created, and we can create several VMs with diff disk off that base (so you can test different scenario, without copying the base image several time).
Another reason to show you this, is that’s what Test-Kitchen (or more accurately, Kitchen-Hyperv) does under the hood.
Create VM with Diff Disk
This file contains hidden or bidirectional Unicode text that may be interpreted or compiled differently than what appears below. To review, open the file in an editor that reveals hidden Unicode characters.
Learn more about bidirectional Unicode characters
| New-VHD -Differencing -ParentPath .\BaseWMF5.vhd -Path .\BaseWMF5_diff.vhd | |
| New-VM -Name TestBase -BootDevice IDE -VHDPath .\BaseWMF5_diff.vhd -SwitchName inet -Path .\hyperv\ | |
| Start-VM TestBase |

Create and Run Pester Test
Pester is a Test framework for PowerShell.
In Windows 10, WMF 5 and Pester are bundled with the OS by default. But when you have installed the WMF 5 from the MSU, Pester is not present on your system.
WMF 5 includes the PackageManagement module, which is a Package Management Management tool (yes, Management x 2, not a typo).
This module let you interact with the PowerShell Gallery, where Pester is available for download via this tool, although it requires NuGet (another provider) under the hood.
Note: You should first bootstrap nuGet, but even if you import the provider, you won’t be able to use it until you restart your PowerShell session:
This file contains hidden or bidirectional Unicode text that may be interpreted or compiled differently than what appears below. To review, open the file in an editor that reveals hidden Unicode characters.
Learn more about bidirectional Unicode characters
| Install-PackageProvider -Name nuGet -Force -ForceBootstrap | |
| Import-PackageProvider -Name nuGet -Force -ForceBootstrap | |
| #Restart your PowerShell console / ISE. | |
| Find-package Pester | install-package |
You can now create a quick Pester test that ensure the PSVersion.Major from PSVersionTable is the one expected.
This file contains hidden or bidirectional Unicode text that may be interpreted or compiled differently than what appears below. To review, open the file in an editor that reveals hidden Unicode characters.
Learn more about bidirectional Unicode characters
| Describe 'Testing Image' { | |
| It 'Should have WMF5' { | |
| $PSVersionTable.PSVersion.Major -ge 5 | should be $true | |
| } | |
| } |
And run it in ISE with F5 (execute page).
Remember to “Never trust a test that you haven’t seen fail“, so at least ensure that the test fails when you change the logic (replace 5 by 6, or -ge by -lt if your image is correct).

Feel free to delete that test VHD and the VM, once the test is successful. Otherwise you should ensure it’s setup properly and sysprep again.
You probably noted that when it boots you still have to configure some bits and pieces and click a couple of times, we’ll address this next.
Automating VM Setup/Install
a. Unattend.xml – Unattended Windows Install
As you saw from the previous steps, when booting a sysprep’ed image, you need to go through the setup again, and some of the elements of your base image might not be configured to your taste (Server Manager popping up, winrm not configured, Firewall settings, RDP, administrator password not set and so on…).
Although it is possible to bake-in all your default configuration in your image, you should be very careful. Whenever you make changes to an image, even if it becomes your base, this is not your starting point. The most un-configured image you get is what is given to you by Microsoft, such as the VHD or better the ISO. This is the RAW state of a machine, or the absolute starting point.
The set of changes you apply to create your base image from RAW should be documented and ideally automatic, because your base is a transitional point between what you get (RAW) and where you want to be (your end state).
The traditional way to automate a Windows Installation (or first run/oobe) is by use of Implicit unattend files (or Autounattend.xml) in one of the default places the installation process is looking for.
Note: If you have different files in different places, remember the Implicit Answer File Search Order.
In short, if you place one autounattend.xml at the root of a removable media, the setup process will automatically pick it up and apply it. You can do that with floppy drive but I prefer using DVD drives as it’s easier to find support for them (i.e. in virtualization environment) and it’s easier to create an ISO programmatically.
I found this gem ‘hidden’ on the TechNet Gallery that allows you to create an ISO from a given list of files or folders.
I’ve added it to my repo in scripts\IsoFile.ps1, so that the function can be dot sourced, and the ISO creation automated.
This file contains hidden or bidirectional Unicode text that may be interpreted or compiled differently than what appears below. To review, open the file in an editor that reveals hidden Unicode characters.
Learn more about bidirectional Unicode characters
| . '.\TestKitchen\script\IsoFile.ps1' | |
| #create ISO with my Unattend.xml file | |
| New-IsoFile -Source .\TestKitchen\Unattend.xml -Path .\TestKitchen\Unattendxml.iso -Force -Title MyISO |
Once you have your iso, you can create a VM to check that the settings are applied to your taste.
This file contains hidden or bidirectional Unicode text that may be interpreted or compiled differently than what appears below. To review, open the file in an editor that reveals hidden Unicode characters.
Learn more about bidirectional Unicode characters
| New-VHD -Differencing -ParentPath .\BaseWMF5.vhd -Path .\BaseWMF5_diff.vhd | |
| New-VM -Name TestBase -BootDevice IDE -VHDPath .\BaseWMF5_diff.vhd -SwitchName inet -Path .\hyperv\ | |
| set-VMDvdDrive -VMName TestBase -Path .\Unattendxml.iso | |
| Start-VM TestBase |
With the new VM starting with the unattend.xml on the removable media, the Setup steps should be skipped and the machine should be configured for you.
I started with Matt Wrock’s Unattend.xml from his post about creating windows image with packer.
You can manually edit the file, but when you want to design your own, see what’s available and so on, you’ll soon need to do it the right way, which I’ll show you next.
b. DISM – modify and capture your image .wim
Here’s a couple of tricks that can prove useful when working on image.
- Updating an image without creating and booting a VM
- Capturing a WIM image (Windows IMaging format)
Note: WIM files can store several images while reducing footprint via Single-instance storage (data de-duplication). Make sure you refer to the correct one when updating (the index parameter, 1 usually).
Updating an offline image (VHD or WIM)
We’ve seen earlier how to install WMF5 and run Windows update before Sysprep’ing an image to ensure it’s up to date before deployment.
In the case of WIM or VHD(X) windows image, some of this management can be done without creating and booting a VM thanks to the DISM cmdlets.
You can apply a patch or update (msu or cab, no exe), add package (appx), or apply unattend.xml file.
This file contains hidden or bidirectional Unicode text that may be interpreted or compiled differently than what appears below. To review, open the file in an editor that reveals hidden Unicode characters.
Learn more about bidirectional Unicode characters
| Mount-WindowsImage -ImagePath .\baseNoWMF5.vhd -Path ./VHD -Index 1 | |
| Add-WindowsPackage -PackagePath .\Win8.1AndW2K12R2-KB3134758-x64.msu -Path .\VHD | |
| Use-WindowsUnattend -UnattendPath C:\src\winopsconf\TestKitchen\Unattend.xml -Path .\VHD | |
| Dismount-WindowsImage -Path .\VHD -Save |
Note: If you want to reduce the footprint of your image (to speed-up your feedback loop), you can:
- Remove unused roles and features binaries (Features on demand)
- Use dism.exe to cleanup sxs (at your own risk!):
Dism.exe /online /Cleanup-Image /StartComponentCleanup /ResetBase
Capturing a WIM Image
If you want to deploy your created image through WDS, or if in our case you need to create a catalogue for Windows SIM (System Image Manager), here’s how you extract a WIM image from your VHD (you can also do it on a running machine).
This file contains hidden or bidirectional Unicode text that may be interpreted or compiled differently than what appears below. To review, open the file in an editor that reveals hidden Unicode characters.
Learn more about bidirectional Unicode characters
| Mount-WindowsImage -ImagePath .\baseNoWMF5.vhd -Path ./VHD -Index 1 | |
| New-WindowsImage -ImagePath .\customImage.wim -CapturePath .\VHD\ -Name customImage | |
| Dismount-WindowsImage -Path .\VHD -Discard |
Note: When you download an Installation media (the ISO), it contains two WIM files, a boot.wim and an install.wim. The last one is similar to what we’re generating in the capture process.
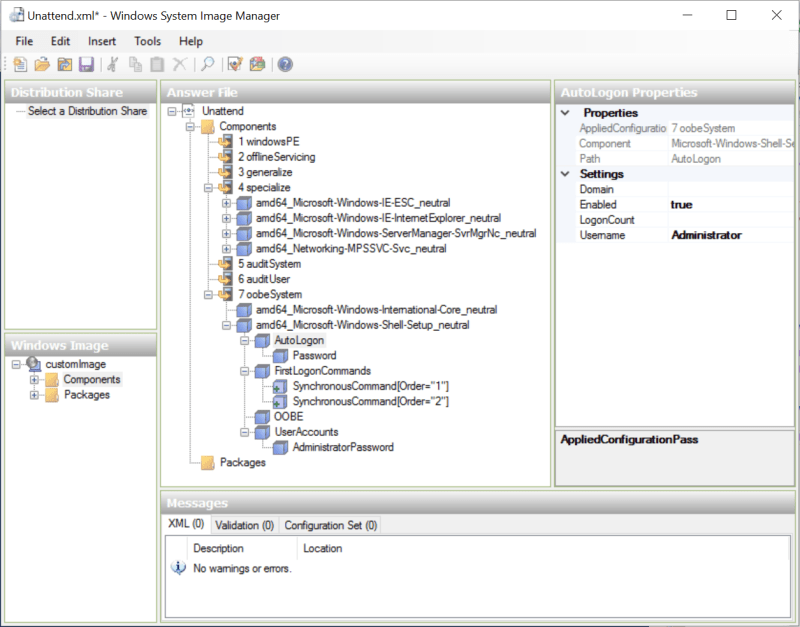
c. Windows System Image Manager – unattend.xml authoring
When authoring the Unattend.xml files, tiny changes can be done by hand, but more extensive changes might invalidate the XML, breaking the Sysprep or Setup process.
Using the Windows System Image Manager allows easy edit and ensure validity.
The SIM tool needs a catalogue extracted from a WIM Image, here’s how to extract it:

You can now edit the Unattend.xml using Windows SIM.
Although the plan is to use DSC for provisioning, the default settings of Windows 2012 R2 are not really facilitating it. For instance, WinRM and the firewall are not configured and so on…
Most of the configuration can be done in this answer file, but some changes are impractical and need to be scripted.
One way to go about that is to setup autologon temporarily (using the LogonCount), and create a FirstLogonCommands.
Those scripts will be run as the Administrator and will run after logon but before showing the desktop.
You can call this, and point to a command or a script file, that you can for instance bundle in your ISO, or call remotely from a web service:
powershell.exe -ExecutionPolicy ByPass -Command “& { <your cmd here> }”
Note: If you add the legal disclaimer before this step, it will block the automation as someone will have to press OK manually before the autologon kicks in. This is why in my Sysprep prepare script, I delete the Registry entry beforehand.
REG DELETE HKLM\SOFTWARE\Microsoft\Windows NT\CurrentVersion\Winlogon /v LegalNoticeCaption
REG DELETE HKLM\SOFTWARE\Microsoft\Windows NT\CurrentVersion\Winlogon /v LegalNoticeText
Conclusion
This you should have given you most of the information needed to create your base image and an ISO you can use to bootstrap your Windows Server. Please let me know if I missed something.
I listed a few tips and tricks that I’ve found along the way, and I introduced a few concepts, tools and techniques I will refer back later.

Get-Help Install-PackageProvider -full
-Force []
Indicates that this cmdlet forces all actions with this cmdlet that can be forced. Currently, this means the
Force parameter acts the same as the ForceBootstrap parameter.
-ForceBootstrap []
Indicates that this cmdlet automatically installs the package provider.
You are use both switches 🙂
LikeLike